How to Generate and Add SSH Key to GitHub
How to Generate and Add SSH Key to GitHub (Complete Guide for Beginners) | by Udara Shanuka Senarath | Medium
Section titled “How to Generate and Add SSH Key to GitHub (Complete Guide for Beginners) | by Udara Shanuka Senarath | Medium”Excerpt
Section titled “Excerpt”How to Generate and Add SSH Key to GitHub (Complete Guide for Beginners) If you’ve ever had to type your GitHub username and password every time you push code or struggled with authentication …
4 min read
Oct 18, 2025
If you’ve ever had to type your GitHub username and password every time you push code or struggled with authentication issues. it’s time to switch to SSH keys.
SSH keys make it easier (and more secure) to connect your computer to GitHub no more typing credentials every time!
In this article, you’ll learn:
- What an SSH key is
- Why you should use SSH instead of HTTPS
- How to generate an SSH key
- How to add it to GitHub
- How to test and verify your connection
Let’s dive in.
What Is an SSH Key?
Section titled “What Is an SSH Key?”An SSH key (Secure Shell key) is a cryptographic key pair used to authenticate your computer to a remote server, in this case, GitHub.
It consists of:
- Private key → stays on your computer (keep it secret!)
- Public key → shared with GitHub or other services
When you push or pull code, GitHub verifies that your private key matches your registered public key without needing a password.
Why Use SSH Keys for GitHub?
Section titled “Why Use SSH Keys for GitHub?”Here’s why developers prefer SSH:
- Security: Your private key is never sent over the internet.
- Convenience: No need to re-enter username or password.
- Automation: Perfect for CI/CD and GitHub Actions.
- Speed: Fewer authentication prompts = faster workflow.
Ok. Let’s Start.
Section titled “Ok. Let’s Start.”Step 1 — Generate a New SSH Key
Section titled “Step 1 — Generate a New SSH Key”Open your terminal and run:
<span id="a375" data-selectable-paragraph="">ssh-keygen -t ed25519 -C <span>"your_github_email@example.com"</span></span>Replace
_"your_github_email@example.com"_with the email linked to your GitHub account.
Explanation:
ssh-keygen→ command to create a new SSH key pair-t ed25519→ specifies the encryption algorithm (modern, secure, and recommended by GitHub)-C→ adds a label (your email) for identification
Step 2 — Choose Where to Save the Key
Section titled “Step 2 — Choose Where to Save the Key”When prompted:
<span id="ff5c" data-selectable-paragraph="">Enter file <span>in</span> <span>which</span> to save the key (/home/username/.ssh/id_ed25519):</span>Just press Enter to use the default location.
Then you’ll be asked:
<span id="a96b" data-selectable-paragraph="">Enter passphrase (empty <span>for</span> no passphrase):</span>You can either:
- Press Enter twice (no passphrase) for simplicity
- Or add a passphrase for extra security (recommended if it’s your personal machine)
Your keys will be saved at:
- Private key:
~/.ssh/id_ed25519 - Public key:
~/.ssh/id_ed25519.pub
Step 3 — Add SSH Key to Your SSH Agent
Section titled “Step 3 — Add SSH Key to Your SSH Agent”Now, start the SSH agent (a background program that manages keys):
<span id="c3c4" data-selectable-paragraph=""><span>eval</span> <span>"<span>$(ssh-agent -s)</span>"</span></span>What it does:
- Starts the ssh-agent in the background.
- Sets up environment variables so your terminal knows how to communicate with it.
Then add your private key to it:
<span id="4ce0" data-selectable-paragraph="">ssh-add ~/.ssh/id_ed25519</span>This ensures your key is available whenever you push or pull from GitHub.
Get Udara Shanuka Senarath’s stories in your inbox
Section titled “Get Udara Shanuka Senarath’s stories in your inbox”Join Medium for free to get updates from this writer.
What this does:
- Loads your private key (
id_ed25519) into the ssh-agent’s memory. - If you protected your key with a passphrase, you’ll be asked to enter it here.
- Once added, the agent will automatically use this key for any SSH connection to GitHub (or other servers).
What Is the SSH Agent?
Section titled “What Is the SSH Agent?”The ssh-agent is a background program that securely stores your private keys in memory while your system is running.
When you try to connect to GitHub over SSH, the agent automatically provides the right key, so you don’t have to re-enter passphrases or manually reference your key every time.
Think of it like a password manager for your SSH keys.
NOTE : You only unlock your key once per session.If you don’t want to manually run these commands every time, you can configure your system to auto-load your SSH key when you log in.
For example, on Ubuntu:
- Edit your
~/.bashrcor~/.zshrc - Add these lines at the end:
<span id="e42e" data-selectable-paragraph=""><span>eval</span> <span>"<span>$(ssh-agent -s)</span>"</span><br>ssh-add ~/.ssh/id_ed25519</span>Step 4 — Copy Your Public Key
Section titled “Step 4 — Copy Your Public Key”Run :
<span id="b332" data-selectable-paragraph=""><span>cat</span> ~/.ssh/id_ed25519.pub</span>This will display a line starting with:
<span id="806f" data-selectable-paragraph="">ssh-ed25519 AAAAC3NzaC1lZDI1NTE5AAAAI...</span>Copy the entire line (that’s your public key).
Step 5 — Add SSH Key to GitHub
Section titled “Step 5 — Add SSH Key to GitHub”Press enter or click to view image in full size
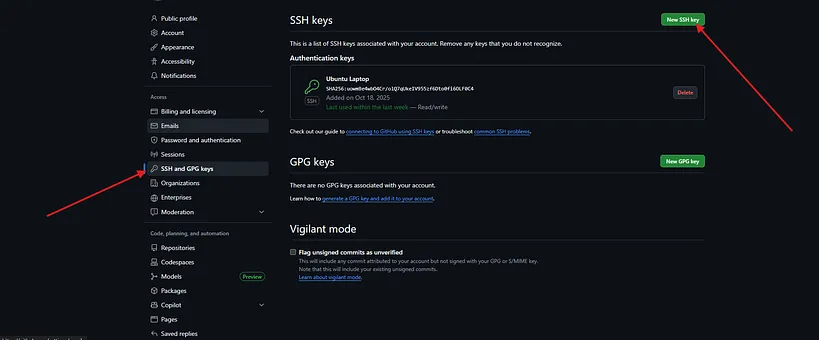
2. Click “New SSH key”
Press enter or click to view image in full size
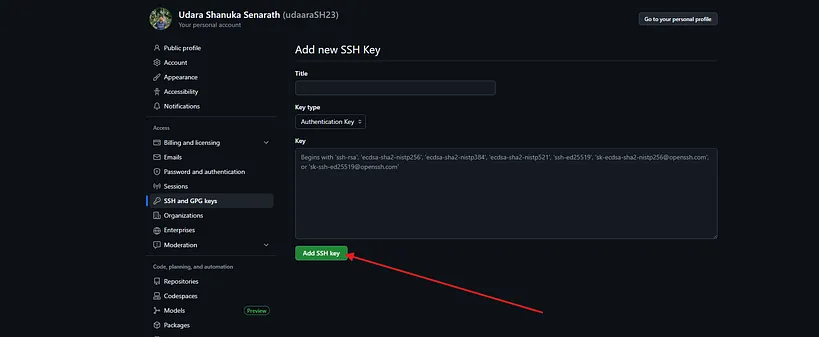
3. Set a descriptive title (e.g., Ubuntu Laptop)
4. Paste your copied key
5. Click “Add SSH key”
Step 6 — Test Your Connection
Section titled “Step 6 — Test Your Connection”Now verify that everything works by running:
<span id="829d" data-selectable-paragraph="">ssh -T git@github.com</span>If successful, you’ll see something like:
<span id="aa1a" data-selectable-paragraph="">Hi udara! You<span>'ve successfully authenticated, but GitHub does not provide shell access.</span></span>Bonus — Make Sure Your Repo Uses SSH Instead of HTTPS
Section titled “Bonus — Make Sure Your Repo Uses SSH Instead of HTTPS”If your repo was cloned using HTTPS, update its remote URL to SSH:
<span id="83e8" data-selectable-paragraph="">git remote set-url origin git@github.com:username/repository.git</span>Now all future git push and git pull commands will use your SSH key automatically.